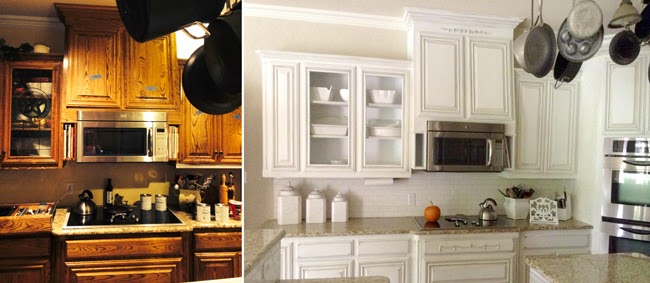
For years, I have toyed with the idea of redoing our dark kitchen cabinets. Painting cabinets, ugh. Huge job, I wasn't sure I was up to tackling. One day, during the dog days of summer I just grabbed a can of chalk paint and jumped in with two brushes.
 |
| What a difference! In all fairness, the old kitchen was shot at night...not really so cavelike. Maybe, it was? |
It was a bit of a shock that first day, going from dark, walnut wood to white. But I have done things like this before and was thoroughly prepared for the shock - kind of.
 |
| What a mess! You can see the first couple coats on the cabinets. There's a long way to go sister! |
There is no stripping and sanding in my future. Ever. Que the Chalk paint. Chalk Paint, if you are one of the few who have not met her yet, is a DIYer's dream paint. It sticks to basically anything, well most anything. There was that time in band camp with my leather recliner and the cracking chalk paint, but that's another blog. I had a partially used can of Pure White, so I grabbed it and went to town.
Now in my opinion, pure white can be too sterile, and stark white. That said, I usually end up using it more than any other color in the Annie Sloan palette. The great thing about Pure White is it doesn't take much to warm it up a bit and it is way better for my tastes than Old White. For me, straight from the can Old white evokes memories of 70's suburbia walls in badly need of freshening. Nobody wants to start a project out with that thought in their head. The best way to use both whites is add just a touch of Old to Pure and you have HabberShabby perfection.
 |
| The BEST paint ever. |
I wanted that Frenchy, white, distressed, but not "old and broken" look for my cabinets.
Covering all that darkness took about three coats of white. That's right folks, three. Three.
OMB (Oh My Bun) THREE feckin coats! Some areas actually took four. Sigh.
To give the cabinets dimension, I used a wash of French Linen in the detail of all the cabinets. Basically brushed it on with a foam brush and then wiped off the flat edges leaving the grooves pretty well covered. Some of you might be wondering why I didn't just use the dark wax as my distressing color? Well, I wasn't sure I wanted that much of a contrast in the grooves. I was going for a softer look. I could have achieved the same look by adding French Linen to Clear Wax. It was less steps to just use the paint as is. I then used a sanding block and lightly sanded the edges to give those cabinets the fresh off French soil look!
 |
| Closeup of French Linen over Pure White with Clear Wax |
To add to my Frenchy look, I turned to rubber inlays or appliqués. You can find them at all kinds of places on the web. Basically it's just a much cheaper version of wood carvings used to give furniture that special pop and lux French look. I started with this one.... and just kept adding. Dreamy, huh?
 |
| Shabby Rose onlay. So pretty and Frenchy! |
Painting my island was fun. I added just a dab, emphasis on dab of Duck Egg to Pure White to get this pale blue. I then used straight from the can Dark Wax to give this area it's dimension. I love, love, love it!
 |
| Center Island. I adore that onlay! |
 |
| So Sexy. So Frenchy. So Right. |
I'm no virgin to complete redo's using white paint. I knew the transformation was going to rule. I have to admit, I was not expecting my kitchen to feel so BIG! Needless, to say, I adore my kitchen. Still working on deciding what pulls to put on the cabinets and drawers, finishing up the last little tidbits, painting those very bottom bits and caulking the new tile. Alas, that's another blog, my pretties!
 |
| Almost done! It looks so big! |
 |
| I love the feeling of layers of different whites. |
 |
| The pumpkin makes the whole kitchen! |
 |
| Close up of the appliqué in front of stovetop. |
 |
| To make those centers of the cabinets pop, I gave it one more brushing of Pure White. |
 |
| We lifted the pot rack. Tall person perk! |


